
[Vuejs] Vue.js tutorial(2) - TypeScript
들어가며
- project 셋팅을 다 하였으니, 개발을 진행하는데 있어서 기본적인 지식에 대해서 알아보자.
- Vue.js는 기본적으로 TypeScript 기반이 아니지만 설정을 통해서 TypeScript 기반으로 변경 가능하다.
- 내가 생각하는 TypeScript의 장점
- 타입을 지정해서 사용하기에 해당 변수의 값을 알 수 있다.
- 잘못된 타입의 값을 주입할 경우 IDE에서 에러로 표시 해준다.
- 타입을 지정해서 사용했던 개발 습관을 그대로 적용할 수 있다.
Tree
- 기본적으로 해당 프로젝트가 생성되었을 때 디렉토리 구조에 대해서 공부 한다.
$ tree -L 2 -I "node_modules"
.
├── README.md
├── babel.config.js
├── cypress.json
├── package-lock.json
├── package.json
├── public
│   ├── favicon.ico
│   ├── img
│   ├── index.html
│   └── robots.txt
├── src
│   ├── App.vue
│   ├── assets
│   ├── components
│   ├── main.ts
│   ├── registerServiceWorker.ts
│   ├── router
│   ├── shims-tsx.d.ts
│   ├── shims-vue.d.ts
│   ├── store
│   └── views
├── tests
│   ├── e2e
│   └── unit
└── tsconfig.json

11 directories, 14 files
- 크게
public,src,test,global로 나눌 수 있다. public의 경우는 index.html의 폴더로 활용된다.src는 개발에 필요한 파일들을 보관하며,App.vue,main.ts가 필수이고 시작점이 된다.main.ts는 vue가 시작될 때 index 파일의 역할이며, 설정 값들을 지정하고 render할App을 지정한다.App.vue는 기본적으로main.ts에서 최초 render 할 페이지이며 화면 layout을 구성하는데 사용 된다.test는 unit, E2E 테스트에 필요한 코드들이 위치한 경로이다.global은root하위에 있는 파일들이며, global 설정 값들을 설정하는 파일들이다.
vue 구조
<template>
  <div class="hello">
    ...
  </div>
</template>

<script lang="ts">
  import {Component, Prop, Vue} from "vue-property-decorator";

  @Component
  export default class HelloWorld extends Vue {
    @Prop() private msg!: string;
  }
</script>

<!-- Add "scoped" attribute to limit CSS to this component only -->
<style lang="scss" scoped>
  ...
</style>
.vue파일의 구조는<template>,<script>,<style>3가지로 구성된다.<template>에서는 html tag를 이용해 화면에 표시될 값들을 정의하는 영역이다.<script>는<template>에서 사용할 값들을 정의하거나, vue life cycle 등 java script 로직을 정의하는 영역이다.style은<template>에서 사용한 html tag에 css를 적용하는데 사용된다.
main.ts
import Vue from "vue";
import App from "./App.vue";
import "./registerServiceWorker";
import router from "./router";
import store from "./store";

Vue.config.productionTip = false;

new Vue({
  router,
  store,
  render: h => h(App)
}).$mount("#app");
main.ts에서는 vue 시작시에 필요한 라이브러리, 설정값에 대해서 추가한다.- 현재는
router,store,ServiceWorker에 대해서 라이브러리를 import하고Vue에 추가를 한 상태이다.
TypeScript
- TypeScript를 하게 되면 추가되는 파일이 2가지가 있다.
- shims-tsx.d.ts .tsx file에 대해서 사용할 수 있게 설정을 추가한다.
- shims-vue.d.ts .vue 파일에 대해서 import 및 사용할 수 있게 설정을 추가한다.
<script lang="ts">
  import {Component, Prop, Vue} from "vue-property-decorator";

  @Component
  export default class HelloWorld extends Vue {
    @Prop() private msg!: string;
  }
</script>
<script>부분 에서도<script lang="ts">로 설정을 해줘야 한다.- class type의 component를 하였기에 vue-property-decorator를 이용해서 설정을 해줘야 한다.
- 반드시
export default class HelloWorld extends Vueclass 및 extends Vue를 해줘야 한다. - class 상단에
@Compoent를 추가해줘야 한다. private msg!: string;처럼 msg에 대해서string으로 타입을 지정할 수 있다.@Prop()은 다른 compoent에서 해당 compoent를 사용할 때msg변수 값을 주입 가능 하다.!의 경우는NotNull의 의미로 반드시 해당 compoent를 사용할 때 msg 값을 주입해줘야 한다.
props, data
<script lang="ts">
@Component
  export default class HelloWorld extends Vue {
    //props
    @Prop() private msg!: string;

    // data
    private name: string = "woojin";
  }
</script>
- decorate를 사용하게 되면서 변경된 부분이 많아서 하나씩 알아 보자.
props의 경우 class 내부에 props를 정의해서 사용했는 반면에 decorate에서는 annotation 방식을 이용하게 되었다.- 따라서 필요한 변수마다 annotation을 반드시 추가해줘야 한다.
data의 경우 data fields에 정의를 해서 사용하였지만 class style에서는 멤버변수와 동일하다고 생각하면 된다.
method, computed, watch
<script lang="ts">
  @Component
  export default class HelloWorld extends Vue {
    @Prop() private msg!: string;
    // computed
    get message(): string {
      return this.msg;
    }

    // method
    private getMessage(): string {
      return this.msg;
    }

    @Watch("time", {immediate: true})
    private onChange(newVal: string, oldVal: string): string {
      return newVal;
    }
  }
</script>
- class style의 경우는 guide 문서와 다르기에 확인이 필요하다.
- computed의 경우
get,set을 통해서 구분하게 변경되었다. - method의 경우
methods안에서 작성을 하였는데 class의 method처럼 작성할 수 있다. - method의 경우는 business 로직을 처리할 수도 있고 computed처럼 값 계산에도 활용된다.
- computed의 경우는 페이지가 로딩되었을 때 값이 결정되기에 캐시하기 좋은 값을 설정한다.
- watch의 경우 annotation 방식으로 변경되었다.
- watch의 지정한 “time” data가 변경되는 경우 new데이터와 old 데이터를 전달해주는 역할을 한다.
template 작성
- 기본 셋팅이 된 부분에서
HelloWorld.vue에 template 부분을 수정해 보자.
<template>
  <div>
    <div>@Props : {{ msg }}</div>
    <div>computed : {{ message }}</div>
    <div>method : {{ getMessage() }}</div>
  </div>
</template>
- 불필요한 부분을 제거하고 앞에서 작성했던 msg에 대해서 화면에 표시해보자.
{{}}안에<script>에 정의해둔 method나 변수들을 작성하면 화면에 값을 렌더링할 수 있다.
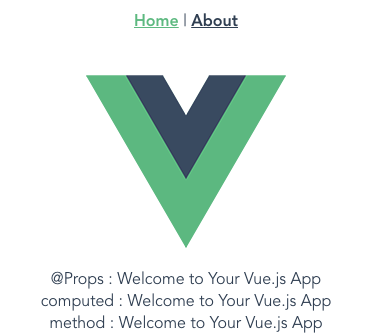
- 같은 데이터이지만 서로 다른 방법으로 데이터를 표시하고 있다.
마치며
class style, vue property decorate, type script까지 알아보았다.
기존에 vue 2.x로 작성하고 있다가 해당 방식으로 바꾸게 되면 다른 언어를 배운 것 처럼 느껴질 수 있다.
특히 vue property decorate 부분을 통해서 기존 문법과 달라진 문법에 대해서 주기적으로 찾아보는게 좋다.
처음 접하는 사람들은 vue guide 문서를 통해서 기본 문법을 미리 학습하는게 좋아보인다.
Vue.js 관련 example code는 github에 올려두었으니 참고~!
Leave a comment