
[Spring Security] Spring Security Basic - BearerTokenAuthenticationFilter
들어가며
BearerTokenAuthenticationFilter가 무엇이고, 어떻게 동작하는지 알아보자.
BearerToken
- authentication에서 인증을 할 때 사용되는 토큰 중 하나이다.
- 보통 Header에
Authentication: Bearer xxxxxxx이런식으로 Bearer이라는 prefix를 주고 그 뒤에 token을 전달하는 방식으로 서버에 토큰을 전달하게 된다. BearerTokenAuthenticationFilter는BearerToken에 대해서 인증을 처리해 주는 역할을 담당한다.
의존성 추가
dependencies {
	...
	implementation 'org.springframework.boot:spring-boot-starter-oauth2-resource-server'
    ...
}
- 기본적으로 Spring이 셋팅이 되어 있다고 가정하고
oauth2-resource-server의존성을 추가 해준다.
Sample
@EnableWebSecurity
public class JwtConfig extends WebSecurityConfigurerAdapter {
  @Override
  protected void configure(HttpSecurity http) throws Exception {
    http.antMatcher("/oauth/**").oauth2ResourceServer()
           .jwt().decoder(NimbusJwtDecoder.withPublicKey(generate("publicKey")).build())
           .and()
           .and()
           .authorizeRequests().anyRequest().authenticated();
  }

  public static RSAPublicKey generate(final String publishKey) {
    try {
      return (RSAPublicKey) KeyFactory.getInstance("RSA").generatePublic(new X509EncodedKeySpec(Base64.getDecoder().decode(publishKey.getBytes())));
    } catch (InvalidKeySpecException | NoSuchAlgorithmException e) {
      throw new RuntimeException(e);
    }
  }
}
oauth2ResourceServer를 통해서 설정이 진행되고,jwt,opaqueToken를 사용해서 설정을 진행할 수 있다.- 여기서는
jwt를 이용하고publicKey를 이용한 셋팅 방식을 진행하려고 한다. publicKey방식을 이용 한다면, decoder는 반드시bean으로 등록되어 있어야 하는데 configure에서 설정을 해주는 방법도 있고@Bean을 통해서 등록하는 방법도 있다.NimbusJwtDecoder.withPublicKey(generate("publicKey")).build()를 이용해서 알고리즘 방식을 정하고RSAPublicKey를 생성해서 decoder를 만들어 주면 된다.
동작 과정
인증 필터 동작 과정
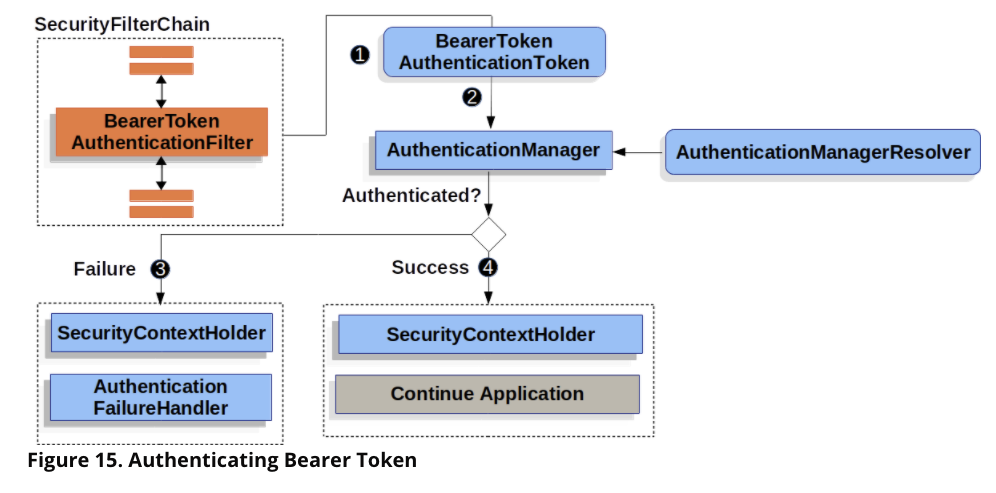
BearerTokenAuthenticationFilter에 대해서 SpringSecurity가 어떤식으로 인증을 처리하는지에 대해서 보기 쉽게 된 다이어그램이다.- 해당 다이어그램은 인증필터면 같은 방식으로 진행되고 있어서 앞에 다른 필터와 비슷하게 처리되지만 실제 token 처리과정만 다르다고 생각하면 된다.
토큰 처리 과정
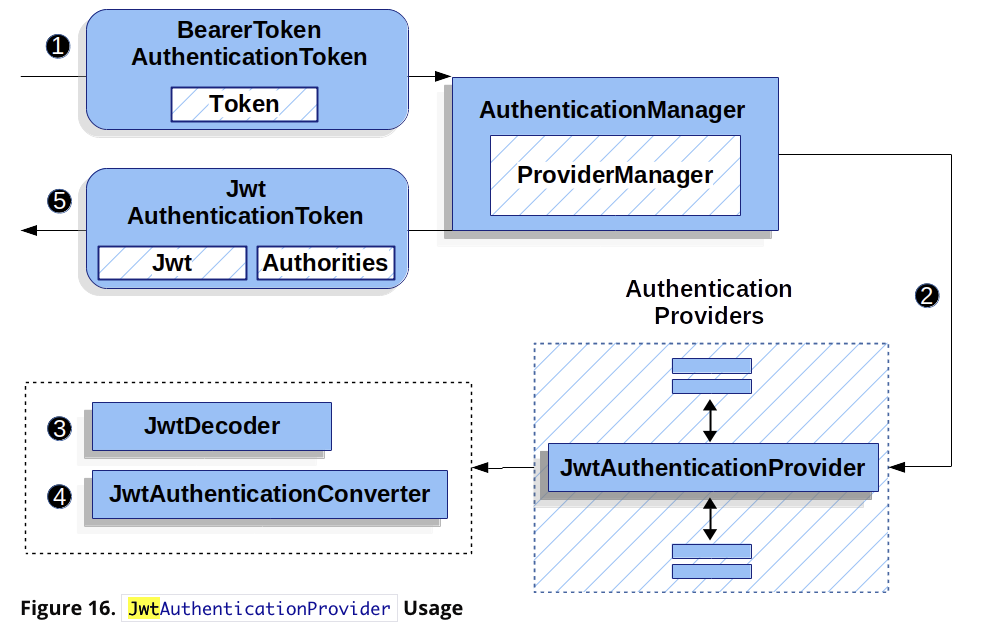
- 유저가
BearerToken으로 인증을 요청했을 때 Token을 가공하여 원하는 Authentication을 만드는지에 대한 순서도 이다.
@Override
protected void doFilterInternal(HttpServletRequest request, HttpServletResponse response, FilterChain filterChain)
		throws ServletException, IOException {

  final boolean debug = this.logger.isDebugEnabled();

  String token;

  try {
    token = this.bearerTokenResolver.resolve(request);
  } catch ( OAuth2AuthenticationException invalid ) {
    this.authenticationEntryPoint.commence(request, response, invalid);
    return;
  }

  if (token == null) {
    filterChain.doFilter(request, response);
    return;
  }

  BearerTokenAuthenticationToken authenticationRequest = new BearerTokenAuthenticationToken(token);

  authenticationRequest.setDetails(this.authenticationDetailsSource.buildDetails(request));

  try {
    AuthenticationManager authenticationManager = this.authenticationManagerResolver.resolve(request);
    Authentication authenticationResult = authenticationManager.authenticate(authenticationRequest);

    SecurityContext context = SecurityContextHolder.createEmptyContext();
    context.setAuthentication(authenticationResult);
    SecurityContextHolder.setContext(context);

    filterChain.doFilter(request, response);
  } catch (AuthenticationException failed) {
    SecurityContextHolder.clearContext();

    if (debug) {
      this.logger.debug("Authentication request for failed!", failed);
    }

    this.authenticationFailureHandler.onAuthenticationFailure(request, response, failed);
  }
}
1 - Client가 request로 BearerToken을 Header or parameter로 포함해서 전달하게 되면 BearerTokenAuthenticationFilter에 bearerTokenResolver에서 token을 가져오게 되고 이후에 authenticationManager에
의해서 authenticate를 진행한다.
@Override
public Authentication authenticate(Authentication authentication) throws AuthenticationException {
  BearerTokenAuthenticationToken bearer = (BearerTokenAuthenticationToken) authentication;

  Jwt jwt;
  try {
    jwt = this.jwtDecoder.decode(bearer.getToken());
  } catch (BadJwtException failed) {
    throw new InvalidBearerTokenException(failed.getMessage(), failed);
  } catch (JwtException failed) {
    throw new AuthenticationServiceException(failed.getMessage(), failed);
  }

  AbstractAuthenticationToken token = this.jwtAuthenticationConverter.convert(jwt);
  token.setDetails(bearer.getDetails());

  return token;
}
2 - JwtAuthenticationProvider에 authentication에서 token에 대해서 인증을 검사하게 된다.
@Override
public Jwt decode(String token) throws JwtException {
  JWT jwt = parse(token);
  if (jwt instanceof PlainJWT) {
    throw new BadJwtException("Unsupported algorithm of " + jwt.getHeader().getAlgorithm());
  }
  Jwt createdJwt = createJwt(token, jwt);
  return validateJwt(createdJwt);
}
3 - token에 정보를 가져오기 위해 NimbusJwtDecoder에서 decode를 진행한다.
@Override
public final AbstractAuthenticationToken convert(Jwt jwt) {
  Collection<GrantedAuthority> authorities = extractAuthorities(jwt);
  return new JwtAuthenticationToken(jwt, authorities);
}
4 - JwtAuthenticationConverter에서 jwt 를 convert하여 JwtAuthenticationToken을 가져오게 된다.
마치며
- jwt, spring security가 기본 베이스로 있는 경우에는 쉽게 이해할 수 있을거 같지만.. 모르는 경우에는 암호화된 내용으로 알 수 있다.
BearerTokenAuthenticationFilter를 사용하고 있어서 어떻게 동작하는지 궁금했었는데, 이렇게 기록을 해둬서 나중에 한번 더 확인을 하는 용도로 작성을 하였다.JwtAuthenticationConverter에서는DEFAULT_AUTHORITY_PREFIX를ROLE_가 아닌SCOPE_를 사용한다는 점이 다르니 필요시에는Conveter를 custom해서 사용해야 한다.
Leave a comment