
[Slack] Slack daily bot을 만들어보자 (1)
들어가며
node.js와 slack client를 이용해 slack의 bot을 만들어보자.
요즘 코로나로 인해 재택근무를 하고 있어 데일리 스크럼을 slack에 공유하는 방식을 이용하고 있다.
사내에서 업무 툴로 사용하고 있는 slack에 bot을 만들어 자신의 데일리 스크럼 기록을 해두고
나중에도 쉽게 찾을 수 있도록 해보는 것이 최종 목표이다.
사내에서는 workflow builder를 이용해서 만들었지만 workflow builder는 standard 이상의 채널에서만 제공해주고 있어 event 처리 방식으로 변경한다.
개발 환경
- Node.js
- Slack client
셋팅 하기
channel 생성
가장 먼저 해야 할 일은 slack을 이용해서 channel을 생성할 수 있어야 한다.
이것은 간단하니 생략!
Hubot 추가
그리고 해당 채널에 Hubot app을 추가해야 한다.

해당 채널에서 설정 버튼을 눌러서 add an app 을 눌러준다.
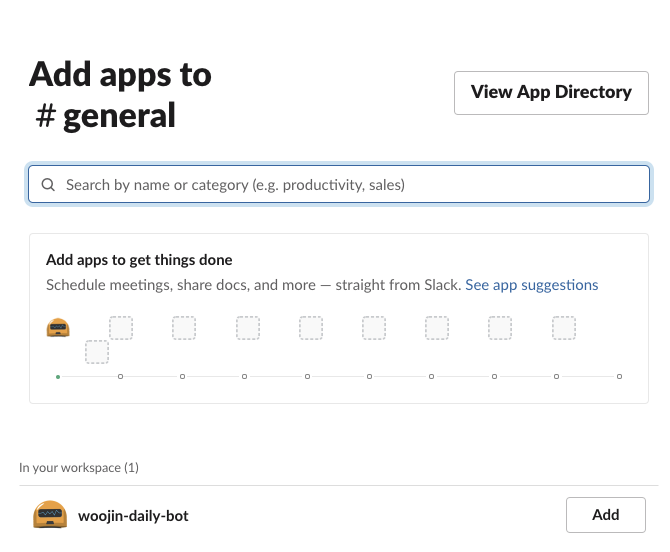
그 다음에 나오는 화면에서 View App Directory를 통해서 slack 웹 페이지에 접근한다.
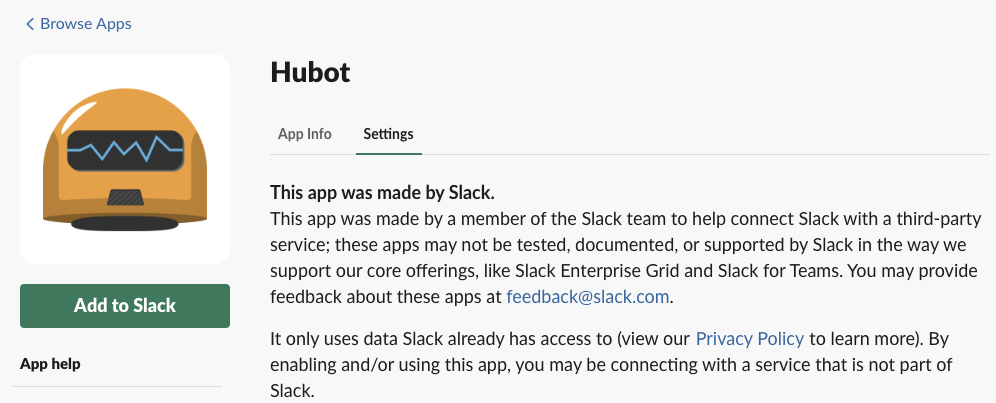
검색창에 Hubot을 입력하여 찾은 후 Add to Slack을 클릭한다.

추가하고 싶은 Slack bot의 이름을 설정한다.
slack bot을 추가하게 되면 API token이 발급 되는데 해당 API token을 이용해서
해당 채널에 메시지를 보낼 수 있게 된다!
Node.js 셋팅
node.js는 intellij에서 제공하는 express의 기본형태를 사용하여 만들자.
말 그대로 아무 express면 상관없다
그리고 slack 에서 제공하는 client에 대해서 npm install을 통해서 셋팅하자.
$ npm install @slack/web-api
해당 node.js에서 npm install을 통해서 해당 라이브러리를 추가 한다.
const { WebClient } = require('@slack/web-api');

// Read a token from the environment variables
const token = process.env.SLACK_TOKEN;

// Initialize
const web = new WebClient(token);
bot을 생성하면서 추가했던 token을 입력 후 WebClient를 생성한다.
// Given some known conversation ID (representing a public channel, private channel, DM or group DM)
const conversationId = '...';

(async () => {

  // Post a message to the channel, and await the result.
  // Find more arguments and details of the response: https://api.slack.com/methods/chat.postMessage
  const result = await web.chat.postMessage({
    text: 'Hello world!',
    channel: conversationId,
  });

  // The result contains an identifier for the message, `ts`.
  console.log(`Successfully send message ${result.ts} in conversation ${conversationId}`);
})();
그 후 WebClient를 이용해서 메시지를 전달하면 성공~
하지만 해당 방식은 conversationId 즉 channel id를 알아야 전송이 가능하다.
해당 방식으로는 channel id가 알기 어려우니 rtm client를 통해서 메시지를 전송해 보자.
해당 방식을 설명한 이유는 나중에 message에 thread로 응답을 추가하기 위해서 필요하다.
RTM Client 셋팅
$ npm install @slack/rtm-api
마찬 가지로 rtm-api를 npm install을 통해서 추가한다.
const { RTMClient } = require('@slack/rtm-api');

// Read a token from the environment variables
const token = process.env.SLACK_BOT_TOKEN;

// Initialize
const rtm = new RTMClient(token);
앞에서 등록했던 token과 동일하기에 그대로 사용 해주면 된다.
const { RTMClient } = require('@slack/rtm-api');
const token = process.env.SLACK_BOT_TOKEN;

const rtm = new RTMClient(token);

(async () => {
  // Connect to Slack
  const { self, team } = await rtm.start();
})();
RTM(Real Time Message)는 web socket을 이용하고 있으며 start를 하는 순간 부터 해당 채널에 연결 된다.
const { RTMClient } = require('@slack/rtm-api');
const token = process.env.SLACK_BOT_TOKEN;
const rtm = new RTMClient(token);

// Attach listeners to events by type. See: https://api.slack.com/events/message
rtm.on('message', (event) => {
  console.log(event);
});

(async () => {
  await rtm.start();
})();
start를 했으니 event 중에 message를 listen하고 있다가 해당 message가 오면
log를 찍는 역할을 만들었다.
{ client_msg_id: '9544d9e7-ec90-4a46-b9eb-8738b08da041',
  suppress_notification: false,
  type: 'message',
  text: 'hi',
  user: 'U0104FVEABZ',
  team: 'T0104S23GTG',
  blocks:
   [ { type: 'rich_text', block_id: 'yNst', elements: [Array] } ],
  source_team: 'T0104S23GTG',
  user_team: 'T0104S23GTG',
  channel: 'CV3S4RYHG',
  event_ts: '1584366142.000600',
  ts: '1584366142.000600' }
hi라는 간단한 메시지를 보내니 위와 같이 로그가 찍혀나왔다.
여기서 중요한 부분은 channel과 ts인 것만 기억하자.
const { RTMClient } = require('@slack/rtm-api');
const token = process.env.SLACK_BOT_TOKEN;
const rtm = new RTMClient(token);

rtm.on('message', async (event) => {
  try {
    const message = await rtm.sendMessage(`hello slack world`, event.channel);
    console.log('Message sent successfully', event.channel);
  } catch (error) {
    console.log('An error occurred', error);
  }
});

(async () => {
  await rtm.start();
})();
log를 찍는것 외에도 메시지를 보낼 수 있도록 변경해 보자.
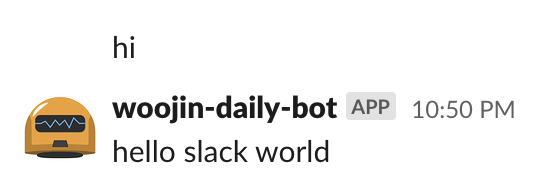
message를 받으면 hello slack world를 응답하는 bot을 만들었다.
thread 답변으로 변경하기
앞에서 잠깐 다뤘던 web client를 이용해서 thread에 답변을 달 수 있도록 변경해보자.
rtm client를 이용해서 message가 왔을 때 channel과 ts를 받는 것을 알 수 있다.
slack에서는 thread_ts를 body에 포함해주면 해당 thread의 메시지로 답변을 해주는 기능이 있다.
// Given some known conversation ID (representing a public channel, private channel, DM or group DM)
const conversationId = 'CV3S4RYHG';

(async () => {

  // Post a message to the channel, and await the result.
  // Find more arguments and details of the response: https://api.slack.com/methods/chat.postMessage
  const result = await web.chat.postMessage({
    text: 'Hello world!',
    channel: conversationId,
    thread_ts: '1584366142.000600'
  });

  // The result contains an identifier for the message, `ts`.
  console.log(`Successfully send message ${result.ts} in conversation ${conversationId}`);
})();
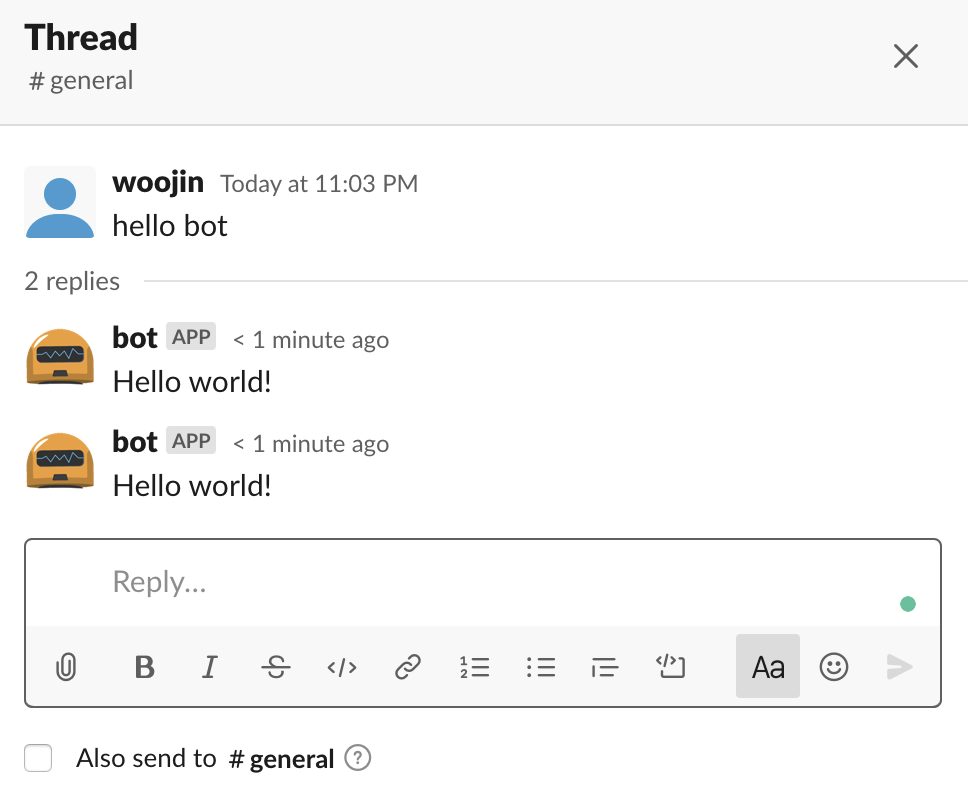
thread에 bot이 댓글을 추가해 주었지만 이벤트 관리를 잘하지 못 하면 여러번 올 수 있으니 주의해야 한다.
마치며
slack을 이용하면서 bot을 이용하면 좀 더 편하게 쓸거 같아서 찾아보다가 다른 팀에서 사용하고 있던 git을 보고 공부하게 되었다.
처음에는 어렵다고 느껴졌지만 원하는 기능들만 실행해보니 정말 간단하게 구성되어 있어서 누구나 원하는 기능을 만들 수 있을 거라 생각한다.
해당 베이스를 바탕으로 slack daily bot을 만들어 보려고 한다.
slack-bot은 해당 github에서 확인 가능합니다.
Leave a comment